Account admins have access to the global settings, allowing them to configure and manage the app efficiently for the entire organization. These settings help tailor the app to organizational needs and ensure a seamless user experience.
📒Note: App profile admins cannot access the global settings. However, they can access the overview for the specific app profile to which they have admin access.
The Settings include the following options:
1. Overview
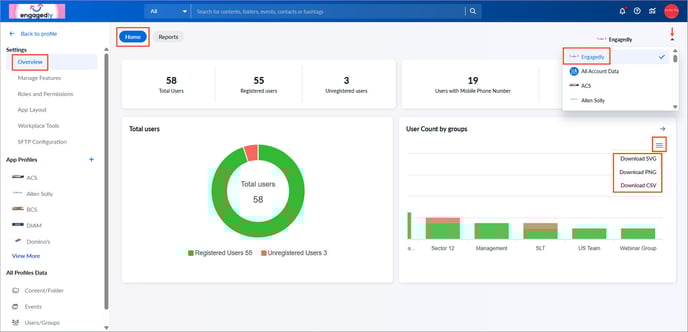
The overview in the Home tab displays key employee data of each app profile, helping you monitor participation, improve registration, and drive targeted actions.
Data displayed includes:
- Total employees
- Registered employees
- Unregistered employees
- Employees with a mobile phone number
- Employees opted in to SMS
Navigate to Settings > Overview > Home.
Click the drop-down at the top right to:
- Select All Account Data to view organization-wide data.
- Select a specific app profile to view targeted data.
To download group-wise employee counts:
- Go to the User Count by groups section, click the Hamburger ≡ Menu, select a download option.
The Reports tab contains various reports organized into different categories.
- Application reports
- Analytics reports
- Content reports
Learn more in View analytics and export reports.
2. Manage features
You can manage specific features across the organization by enabling or disabling them.
Navigate to Settings > Manage Features.
- Enable Directory: Enable the directory for the organization to add contacts.
- Enable User Analytics: Enable dashboard availability for admins.
- Email Verification: Requires employees to verify their email address during registration.
- Enable User Profile Pictures: Allow employees to change their profile pictures.
📒Note: You can change employees’ profile pictures regardless of this setting.
- Enable Email Notification: Sends email notifications to employees when content, alerts, and events are created. Notifies admins when an app profile is created.
- Display User Emails: Allows others to see the employee's email ID with their name when reacting to content.
- Prevent Deletion of Users Missing from Upload: By default, missing employees are deleted when you upload a CSV file. Enable this setting to keep them and delete manually if required.
- Enable Text Messages (SMS): Enable text messages to employees who opt in.
📒Note: Contact our support team to enable or disable SMS for your organization.
After enabling:
- Click Send Opt-in SMS, select the groups to which you want to send SMS, and click Send.
- Select the app profiles to which you want to send SMS.
Newsfeed options include:
- Enable Reactions: Allows employees to react to posts using emojis (like or celebrate).
- Enable Comments: Allows employees to comment on posts and engage in discussions.
- Receive alert after comment: The content publisher receives a notification when an employee comments on their post.
- Display content publisher: Shows the content publisher’s name who published it in the news feed.
- Company Website: Saves your organization’s website for reference only. This information is not displayed anywhere on the platform.
After making the necessary changes, click Save at the bottom right.
3. Roles and permissions
You can assign the account admin (system admin) role to any employee within your organization, granting them full access to all app profile data. This allows them to add, edit, or delete any component of your apps.
Navigate to Settings > Roles and Permissions.
- In the Account Permission field, click the drop-down, type the employee’s name, and select them.
- In the Active System Administrators field, click the Cancel
 Icon to remove the current account admin if required.
 - Click Save at the bottom right.
4. App layout
You can customize your homepage layout.
Navigate to Settings > App Layout.
- Enable the option as required.
-
- Apps
- Calendar
- Directory
- Quick links
2. Click the drop-down and select an app profile to set it as the default app profile.
3. Click Save at the bottom right.
5. Workplace tools
You can add and manage important tools or applications for your organization, making them easily accessible from the homepage across all app profiles. This improves visibility, streamlines workflows, and enhances employee efficiency.
Navigate to Settings > Workplace Tools.
- Click Add at the top right.
- Click the drop-down and select an app from the list.
- If the selected app is pre-configured with a URL, it auto-populates.
- You can also manually enter a URL if required.
📒Note: Once selected, you cannot change the app.
3. Click the group drop-down and select the group to which you want to grant app access.
📒Note: Only selected groups can view the apps on their homepage.
4. Enable one or both of the following options as required.
- Open in Mobile app
- Open in Web app
5. Click Add at the bottom right to save the tool.
After adding tools, you can manage them as required.
- Toggle the button to enable or disable a tool.
- Hover over the tool and select Edit or Remove on the right.
📒Note: Once you remove the tool, you cannot undo this action.
6. SFTP configuration
You can securely integrate internal systems with theEMPLOYEEapp using Secure File Transfer Protocol (SFTP) to automate employee data syncs, such as new hires, profile updates, and deactivations, from their HRIS or internal database. Learn more in Configure SFTP in theEMPLOYEEapp.