Employees can create contacts only only if the account admin gives permission.
What admins can do
Admins can create a directory and contacts within it, and give employees either:
- Edit access: To manage the directory, create contacts, and manage contacts.
- View access: To view the directory and contacts within it.
📒Note: Employees cannot add directories and contacts. However, they view and edit them based on the permissions.
With the edit access, you can perform the following actions:
Navigate to the Directory on the left pane.
Create contact
Create and store both employee details and external contacts.
- Select the directory where you want to add a contact.
- Click Add at the top right and select Create Contact.
- Type the contact’s name.
📒Note: The first and last names are required, while the other details are optional.
4. Type the job role and upload their image.
5. Type their organization’s name and address.
6. Enter the email ID and phone number.
7. Add additional information like birthday and gender, and click Save.
Manage contact
After adding a contact, manage it if required.
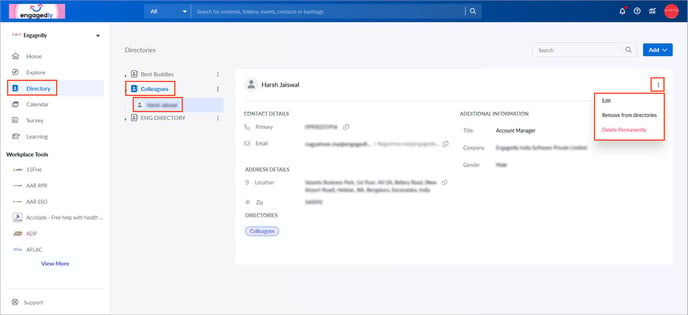
- Select a directory and then select a contact that you want to manage.
- Click the Overflow
 Menu at the top right and select the option as required.
-
- Edit: Edit the contact information.
- Remove from directories: Remove contact from the selected directory.
- Delete Permanently: Remove contact from all directories.
📒Note: A contact can belong to multiple directories.
Copy contact
Copy contacts from a different directory within the same app profile.
- Select a directory from which you want to copy the contacts.
- Click Add at the top right and select Copy Contacts from Other Directories.
- Select the contacts and click Copy.
📒Note: If you do not have access to other directories, you cannot view contacts in the Copy Contacts from Other Directories pop-up.
Upload contact
Upload contacts via an Excel file.
- Select a directory where you want to upload the contacts.
- Click Add at the top right and select Upload Contact CSV.
📒Note: Uploading a CSV file to the directory replaces all existing contacts within it. It is recommended to upload a CSV file into an empty directory.
3. Click Download Sample, open the downloaded file, enter the contact information, and save the file.
4. Return to theEMPLOYEEapp, click Upload File, select the file, and click Open.
5. Click Save.