After creating a course, authors can add sections and units to it and manage it. Adding sections and units to a course helps organize the content effectively and provides a structured learning experience for learners.
After adding sections and units, preview the course.
📒Note: You can add sections and units to a course that is authored by you.
Add section and unit
After creating a course, you are redirected to the course edit page to add sections and units.
Alternatively, perform the following steps to add them.
Add multiple sections to a course to group related chapters.
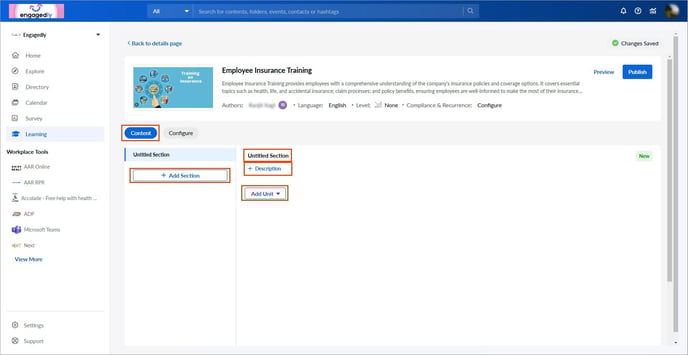
Navigate to Learning on the left pane.
- At the top right, click Manage Resources.
- Click Authored by you and select a course.
- In the Content tab, perform the following actions:
- Click Untitled Section, type the section name, and click the Tick
 Icon to save it.
 - Click Description, type the description for the section, and click the Tick Icon to save it.
After adding a section, add multiple units to it.
- Click Add Unit and select the unit type.
📒Note: You can add units to a course without adding the section. However, if you add a section after adding the units, the existing units automatically move into the section.
Add multiple sections to a course to group related topics, providing a clear structure and seamless learning experience.
- Click Add Section to add another section.
4. Type the section title and description and click Add.
Manage section
After creating a section, edit and delete it if required.
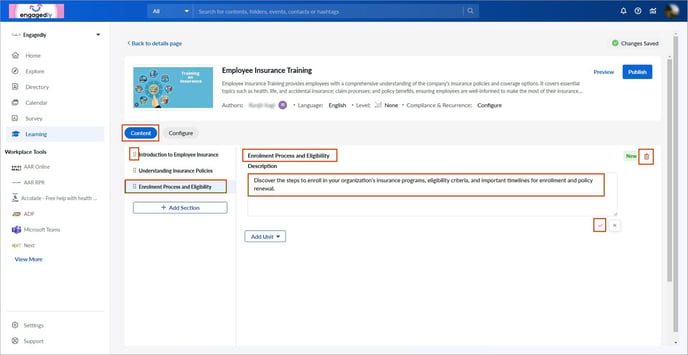
4. In the Content tab, select a section on the left.
5. Click the section name and description on the right.
6. Edit them as required and click the Tick ![]() Icon to save the changes.
Icon to save the changes.
7. Click the Delete ![]() Icon on the right side of the description to delete it.
Icon on the right side of the description to delete it.
📒Note: Deleting the section deletes its units.
8. Drag the Six Dot ![]() Icon on the left to rearrange the sections.
Icon on the left to rearrange the sections.
The changes are auto-saved.
Types of units:
Add the following types of units in a section as required:
- Document: Upload a PDF file, allowing the learner to download it.
- Media: Upload a video or audio file, allowing the learner to download it.
- URL: Enter the link.
- Quiz:
- Display the correct answer after completion.
- Set the passing score.
- Link the quiz result with course completion.
📒Note: If you enable the option Link the quiz result with course completion and a learner fails in the quiz, the course status remains in progress.
-
- Allow learners to retake a failed quiz.
- Set the number of retake attempts.
- Text: Type content in the text format.
- Instructor training: Add sessions and attendees to the training.
- AICC: Add an AICC package and link its completion to the course completion if required.
- SCORM: Add the SCORM package and link its completion to the course completion if required.
📒Note: You must navigate to the respective URL to preview the AICC and SCORM units.
- LTI: Select the connector.
📒Note: If you have H5P integration with Engagedly, you can import content from H5P within Engagedly's LXP. Learn more in Integrate H5P with Engagedly.
Manage unit
After adding a unit, edit and delete it if required.
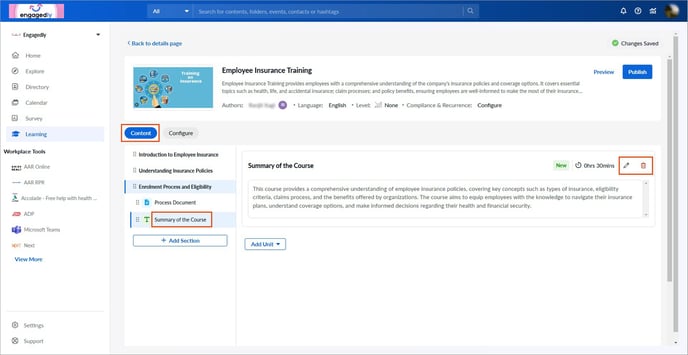
4. In the Content tab, select a unit on the left.
5. Select the Pen ![]() or Delete
or Delete ![]() Icon at the top right of a unit as required.
Icon at the top right of a unit as required.
6. Drag the Six Dot ![]() Icon on the left to rearrange the units.
Icon on the left to rearrange the units.
If you add quiz, training session, and survey units to a course, you must add questions in the quiz, sessions in the training, questions in the survey, respectively.
Preview course
After adding sections and units to a course, preview it before publishing to ensure the content and flow appear correctly to learners.
- On the course details page, click Preview at the top right.
- Select Published Version or Edited Version as required.
📒Note: These options are not available when you publish a course for the first time. However, after editing a published course, preview both the published version and the edited version.
3. Select a unit on the left to preview its content on the right.
You must navigate to the respective URL to preview the AICC and SCORM units.
4. Select the AICC or SCORM unit on the left and click Start on the right.
You are redirected to the AICC or SCORM unit.
After previewing the course, publish it to make it accessible to all employees. Learn more in Publish course.